Scenario: your business premises have been destroyed. Perhaps it was a fire that destroyed the building. Or perhaps it was theft – your servers and the backup storage devices simply vanished.
What do you do?
BackupAssist ER kept a copy of your data in the cloud – safely offsite. So, there is no panic because your data is safe.
From here, we can recommend several different options:
- On-premise recovery: download your backup data to a local machine, and then use this backup to either:
- perform a local VM Instant Boot, or
- perform a local Bare Metal Recovery.
- Cloud recovery: Download your backup data to a cloud machine
,and perform a VM Instant Boot in the cloud.
If you have a local server to recover to, then option 1a is the fastest and most cost-effective way to get running again. It’s very likely that this will be your preferred option.
But what if you don’t have local hardware to recover to? You might be situated in rural Alaska, or the desert in Australia, and it’ll take weeks to get new hardware shipped out. Or maybe your business needs to wait for an insurance payout before it can purchase new hardware.
The last option is what we call the Cloud VMDR, or Virtual Machine Disaster Recovery. You can think of it as the recovery of last resort, because a local recovery is not possible.
What you’ll have at the end of the Cloud VMDR
At the start of the process, we assume that all you have are:
- Your backup data in a cloud storage container. In BackupAssist ER’s “disk to disk to cloud” terminology, this means you have only the “cloud” backup.
- The credentials to access your backup – i.e. the authentication details, and encryption password.
By the end of the process, you’ll have:
- Your original server
isrunning in the cloud - A private network between the cloud and your on-premise network
After you’ve recovered from this emergency situation, you can then decide what to do for a permanent solution. That’s a topic for another blog.
Contents
- How did I do in the challenge?
- Under the hood: The Cloud VMDR process
- How to do it – The Cloud VMDR
- My experiences and observations
- Performance analysis
- Azure costs
- Conclusion
- Resources
How did I do in the challenge?
| Task | Duration |
| Cloud Provisioning | 26 min 27 secs |
| Hands-on with BackupAssist ER – Creating a bootable Lifeline Media on USB – Booting the Lifeline Media, and starting the recovery |
7 min 58 secs |
| Waiting Time – Waiting for Lifeline Media to be created – Waiting for data to be copied from backup to the recovery machine. – Waiting for the recovery machine to boot and detect new hardware, and get to the login screen. |
37 min 7 secs |
| Total time | 62 min 41 secs |
For the BackupAssist ER Challenge Leaderboard, my hands-on time is 7 minutes and 58 seconds.
Here’s the video of me doing it:
Under the hood: The Cloud VMDR process
Of all the recovery options in BackupAssist ER, this is the most intricate. Conceptually, there are just 3 tasks:
| 1 | Download your backup to a Cloud disk. This “reconstitutes” your backup from deduplicated, compressed and encrypted blobs, into a VHDX image of the disks. |
| 2 | Make the backup bootable, by performing a BackupAssist ER “VM Instant Boot” operation |
| 3 | Run your backup as a Hyper-V Guest |
In the ER Recovery Challenge video, you can see me walk through the process as I followed the steps.
The “download your backup” task is worthwhile discussing from a technical viewpoint. As you see in my ER Challenge videos, the backup takes different forms when it’s in different places:
| Locally | VHDX files, with one VHDX per volume backed up |
| In the cloud | Blob storage |
The process of sending the backup to the cloud – i.e. the bold part of “disk to disk to cloud” – involves a file-based approach where each file in the VHDX is processed and goes through the process of “blobification” – splitting files into smaller chunks, deduplicating them and applying compression and encryption.
That means the reverse needs to be done when you want to download a cloud backup, back to a set of local VHDX files. Reconstitution of the VHDX is done file-by-file, to give you a functionally equivalent local backup. In other words, even if your local backup is destroyed, you can simply create another one by downloading the cloud backup.
Of course, you can download the cloud backup to anywhere – an on-premise machine in your offices or your I.T. provider’s office, or a cloud based machine. That’s why “recover anywhere” is such a strong theme in BackupAssist ER.
How to do it – The Cloud VMDR
Here’s the “cheat sheet” version below. The 3 tasks are broken down into individual steps – and you’ll notice that some steps can be performed concurrently – you can provision your Hyper-V Host machine while the backup is downloading, for example. I’ve also color coded each step, to show you which task each step belongs to.
| 1 |
Provision the “backup downloader” VM – a Cloud VM that will download your cloud data from blobs of data, into a VHDX file. As you provision this VM, you should:
|
| 2 | Download and install BackupAssist ER onto this VM, and start downloading your cloud backup.
|
| 3 | Provision the Hyper-V Host machine in the cloud. (You can do this while the backup is downloading to save time.) This is the host that will run your recovered machine from the backup VHDX files. Some recommendations are:
|
| 4 | Wait for your backup to completely download.
|
| 5 | Shut down your “backup downloader” VM, and delete it.
|
| 6 | Connect the backup storage disk to the new Hyper-V Host machine.
|
| 7 | Perform the VM Instant Boot operation to make the backup bootable.
|
| 8 | Create a Hyper-V Guest and start it up!
|
My experiences and observations
I came into this challenge as a “newbie”. As a Microsoft Azure novice, it took me a little while to understand the concept of accounts, subscriptions, resource groups, and so on. But after a while, I figured it out.
Annoyingly, I discovered bugs in the Microsoft Azure console. As I did some practice runs, recording my screen, on two occasions I set up cloud VMs and the VM that Azure created had differing specifications compared to what I selected – once with the Virtual Machine Type, and once with the attached hard disk. (When I order a Big Mac, I expect a Big Mac, not a salad!) I verified on the screen recording that I had correctly specified my option, but Azure simply messed up. I recommend that after you set up your VM, before you hit the final “Create” button, you review each screen of options.
I had to do the recovery three times to figure out the most efficient way of doing it. The first time, I thought I’d do it as “cheaply” as possible – using a 2 vCPU machine, for example. It turned out that the cloud download was taking a long time – there was simply a limitation in the number of files that could be reconstituted at one time. After some discussion with the developers, I quickly realized that the number of vCPUs mattered. (My eventual recommendation is to use a 16 or 32 vCPU machine.)
Finally, I recommend that when you create VMs to do the Cloud VMDR, create them in the same region as your blob storage. This will save you costs – I found I was not charged for bandwidth. (More about that below.)
Performance analysis
For the video walk-through, I chose a 64 vCPU machine. This managed to download the backup in 35 minutes. I did another run subsequently using an 8 vCPU machine, and that took 1hr 15mins. I didn’t know it at the time, but there is a point where more vCPUs won’t necessarily give better performance, because I suspect there’s a limiting bottleneck in the maximum rate of file creation inside the VHDX.
I currently suspect that the sweet spot is either a 16 vCPU or 32 vCPU machine. If I did the challenge again, I’d probably choose a 32 vCPU machine to download the cloud backup.
The remainder of the challenge was fairly straightforward.
Overall, the time taken for the process was:
| Activity | |
| Cloud provisioning– Provisioning 2 VMs for downloading the backup, and running it as a guest – Swapping disks and deleting the old VM. |
26m 27s |
| BackupAssist ER Hands-on time – Installing, connecting to the backup and starting the download – Performing VM Instant Boot |
7m 58s |
| Waiting time – Downloading and reconstituting the backup – Waiting for Hyper-V guest to boot to login screen. |
37m 07s |
| Total – start to finish | 71m 32s |
Azure costs
Another aspect that will be of interest to readers is what the costs were to perform the recovery.
A summary of costs is (as at May 2020):
| Operation | Cost – AUD | Cost – USD |
| Downloader VM – OS disk – VM cost |
$0.09 $4.74 |
$0.13 $7.31 |
| Data disk | $0.18 | $0.27 |
| Hyper-V Host VM – OS disk – VM cost |
$0.09 $0.32 |
$0.13 $0.50 |
| Blob storage – Hot Read operations | $0.09 $0.19 |
$0.13 $0.29 |
| Total | $0.09 $5.61 |
$0.13 $8.64 |
Let’s explain each cost:
- Downloader VM – this is the cost of the Virtual Machine (per hour), both for the VM compute and the OS disk. This machine existed for less than one hour.
- Data disk – this is where we download the backup to. It was created and connected to the Downloader VM, and then was transferred to the Hyper-V Host. This disk will need to be connected for as long as the recovered machine runs in the cloud.
- Hyper-V Host VM – this is the cost of the Virtual Machine (per hour) for the VM (compute) and the OS disk. This cost is incurred for as long as the recovered machine runs in the cloud.
- Blob storage – Hot Read Operations – the full backup was read from blob storage, incurring read costs.
You will note that there were no bandwidth charges. This is because the blob storage and VM are located in the same Region. (n.b. To be more accurate, Microsoft states that there are no bandwidth charges within an availability zone. I was not given any opportunity to specify which availability zone I wanted to use for my blob storage or VMs, so either I just got lucky that I was not charged for bandwidth, or all my resources were in the same availability zone.)
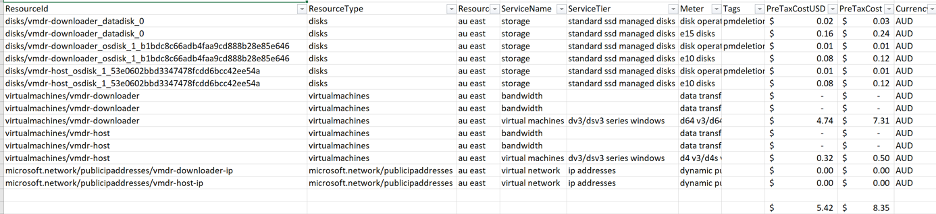
The full breakdown of costs can be seen here:
Conclusion
The Cloud VMDR is the recovery of last resort. However, it seems like an excellent option to have available. The Cloud VMDR was quite doable, even for an Azure novice like me. Most of the time of my Cloud VMDR was spent provisioning Azure machines, and waiting for the backup to download onto the Azure machine. Using BackupAssist ER was a small minority of the overall task.
The design of the Cloud VMDR also means it’s possible to “recover anywhere” – for example, back up to AWS and recover to Azure, or back up to Azure and recover to GCP. Multi-cloud ability can be important to satisfy legislative requirements.
I think it’s also useful to discuss where the Cloud VMDR sits in the marketplace. The thing that strikes me is that it’s very cost effective. The most expensive part of cloud services is VM compute, whereas blob storage is cheap. The brilliant thing about the BackupAssist ER design is that for all the time you’re not running a recovery in the cloud – which should be 99.5% of the time – you only pay for cheap storage, not expensive compute.
In contrast, there are a number of “Business Continuity” solutions that provide the ability to perform a recovery in the cloud. Their solution may be a little faster to get that machine running in the cloud (usually because they use a proprietary appliance for the local backup, and a proprietary cloud for the recovery). However, these solutions also cost many thousands of dollars per year.
The BackupAssist ER solution delivers the benefit of recovery in the cloud, but without the 24/7 billing model of the alternative solutions. That’s just smart business and compelling value for the majority of SMEs, Government departments, NGOs and schools that need flexible recovery options that won’t break the bank.
Resources
Related Articles