Are your Windows workstations safe from Cyber Attack? BackupAssist Classic is well known for providing a comprehensive package of backup and recovery features allowing you to achieve Cyber-Resilience for your Windows Servers (and Exchange and SQL Server). But did you know that you can use these same great features to protect your Windows workstations? In this article I lay out 4 easy steps for achieving cyber-resilience on your workstations, using BackupAssist Classic and our brand new product, BackupAssist WFH.
STEP 1: Build a backup strategy that allows you to recover everything you might need to recover!
Many backup solutions offer a quality backup capability that does one thing really well, like image backups to NAS or replicating changing files to the cloud. Solutions like this give you very little choice for configuring your backups. On the other hand it can be very tempting to think that one particular backup method is “the best”, and to set up your backups this way – and only this way.
But in these cases, the limitation in backup strategy – be it limited features or limited ability – will very likely reduce your chances of being able to recover your data when you need it most.
BackupAssist is different, giving you all the tools to build a backup strategy that really supports your needs. Here’s what I mean:
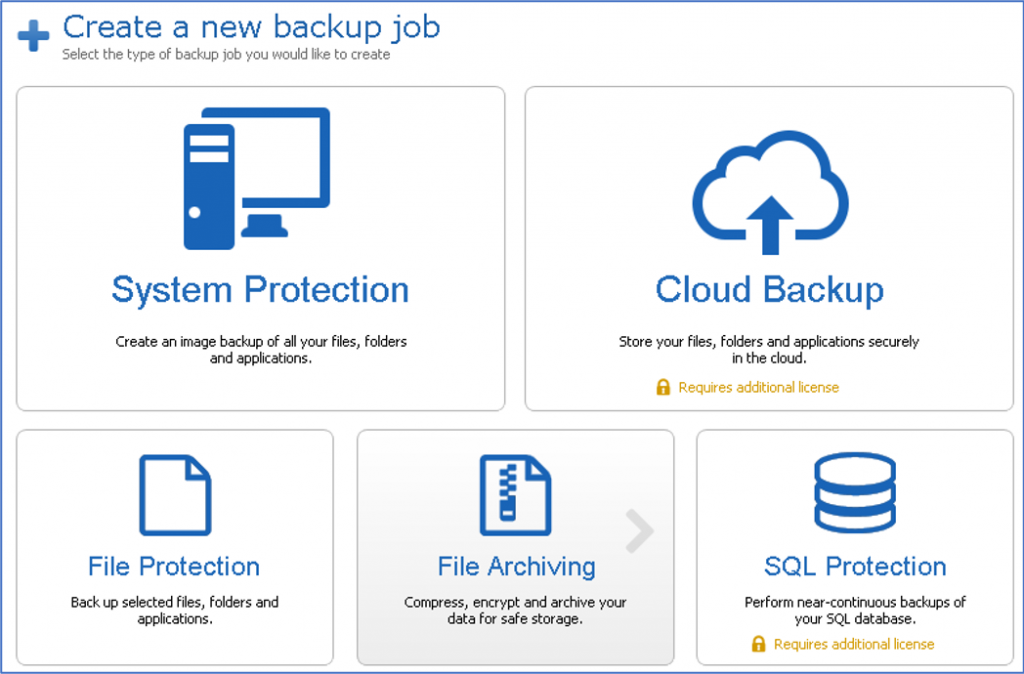
- You can use System Protection if you need a full system image to always be available so you can perform a full disaster recovery when the worst goes down.
- You can copy your files to pretty much anywhere using File Protection, while only copying changed files and giving you full restore points in your backup storage.
- If you like your backup in a single file, you can set up File Archiving to give you backups in the portable Zip file format, with its built-in compression and encryption capabilities.
- And BackupAssist supports backup to all sorts of hardware: to internal and external disks, to NAS using SMB and iSCSI, to Azure and AWS blob storage, as well as to rdx QuikStor cartridges and Windows-supported tape drives (for those who prefer dedicated backup media).
For most people I would recommend a 2-pronged approach, and for workstations it’s no different. My favourite strategy is to perform bare-metal image backups to external hard disk on a weekly schedule, and back up important documents and other files to the cloud on a daily basis. Here’s how this strategy helps:
- Workstations can have a small or a large amount of applications installed, and this can take time to do. In case of a disaster, an image backup that supports bare-metal recovery will allow you to recover to the existing or a new machine if it is needed. And the benefit is that you won’t need to rebuild all of your configuration from scratch.
The reason to only perform backup weekly is that the applications don’t usually change all that often, so there’s no need to take the time and space to back up more than once a week. But you can always run an extra backup before and after you install a new application, just in case! - What does change more often is the content you are working on, on the workstation. Most people use one or more file-to-cloud syncing services like Dropbox or Microsoft OneDrive, and this does provide some protection. However with these services you have zero control over how or where the files are stored in the cloud with such services. And if any files are corrupted, the corruptions are automatically synchronised to the cloud. This could damage your ability to restore.
This is why you should always have a true backup system in place for your files, backing up to a location of your choice – and cloud blob storage is a very effective backup storage mechanism with very little effort required on your behalf.
Action 1: Configure a System Protection backup job and with the default selection of “Entire System” and back up to an External Disk. Use the default scheme but change the day selection so only Friday is selected.
Action 2: Configure a Cloud Backup, File Protection, or File Archiving job and select the folders containing your most important documents and files, and back up to Cloud, External Disk, or a NAS device if you have one.
STEP 2: Enable extra safeguards against cyber attacks.
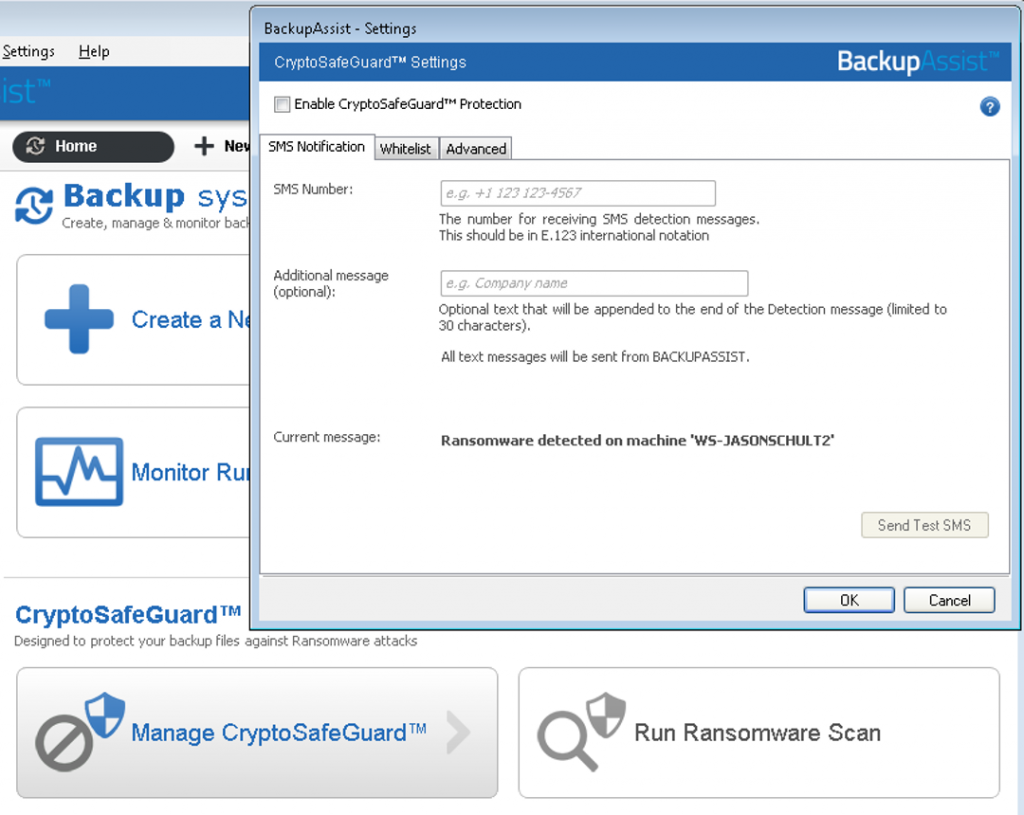
In these modern times where we know that malicious hackers are looking for all and every opportunity where they can infect our systems with ransomware, a good backup strategy that leaves you with backups sitting securely on the shelf and offline in the cloud will give you confidence to know that you will be able to recover your systems and data should the worst happen. But what if there was more you could do to protect your backups and truly safeguard your precious data? That’s why we developed CryptoSafeGuard.
CryptoSafeGuard includes 3 extra levels of protection for your backups, securing your backups with 2 different approaches:
- Firstly CryptoSafeGuard will add a Shield around your connected backups, protecting them from unauthorised modifications – even protecting from accidental changes by users.
- Secondly, before running backups, CryptoSafeGuard will scan the source files to check for signs of ransomware infection. If an infection is suspected, backups will be blocked so that the backup device won’t be polluted with corrupted files.
- And lastly, after blocking jobs, CryptoSafeGuard will notify you by SMS so you can take action to review your machine and network for attack.
These measures mean that even if ransomware gets past your anti-malware and virus scanners, your backups will be kept safe and will be available for you if you need to do a recovery.
CryptoSafeGuard can be easily enabled from the Backup UI, and just enter your mobile number so you are notified if a potential problem is detected.,
STEP 3: Leave your workstation running so your backups can run!
If you’ve never had a scheduled backup system running on your workstation, you may need to change your habits so that the backup can actually run. In particular, and it may seem obvious, but BackupAssist cannot run the backup if you have turned your machine off, hibernated, or put it to sleep – eg. by closing the lid on your laptop.
On the other hand, BackupAssist will awake a machine that is resting due to power saving measures. So when you complete your work for the day, just lock your UI and leave your machine on.
STEP 4: Regularly check your backup strategy is working by running test restores
A backup strategy can be planned correctly and be working properly when you first set it up, but we know that things change (™) so if you aren’t regularly testing your backups then all of the good work you’ve done may be for nothing.
It is critical that you take some time on a routine basis, eg. weekly, to run a test restore from your backups. Imagine the feeling if ransomware strikes, and you find that your backup job has been backing up the wrong data due to a unintentional change that happened a month ago….!!
As a BONUS, you can use Maintenance Notifications to remind you to do these tests.
…
I hope these steps have helped you see how BackupAssist WFH can benefit you in backing up your workstations safely and securely, protecting your workstations and data from all the cyber threats that the modern age now presents.
Have fun and keep safe!
Jason Schultz