TL;DR summary
To fix:

firstly, you need:
- A valid Windows partition on one of your hard drives
- Configure your BIOS to boot that partition
and then…
- Boot into a Windows Recovery Environment – such as the Windows install DVD/USB, or BackupAssist Lifeline media
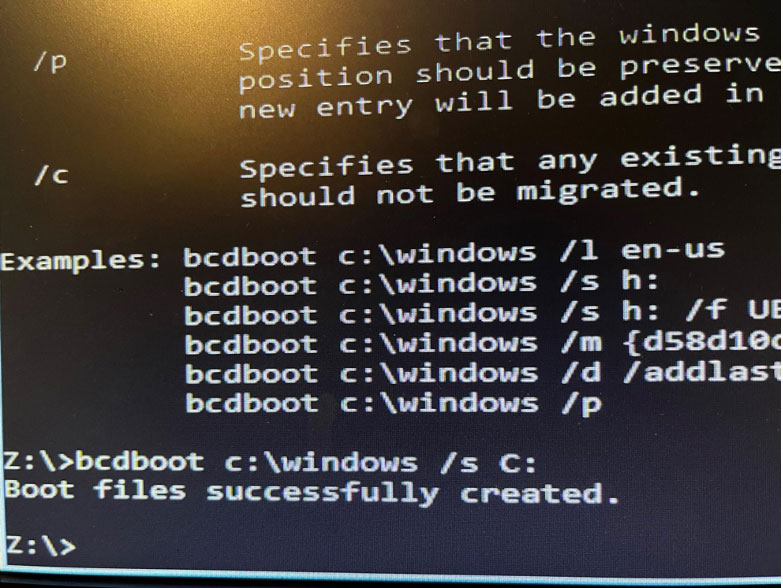
- Run bcdboot c:\windows /s c: where C: is the drive letter containing your Windows installation.
Now let’s explain this in our detailed HOWTO guide.
Windows is there, but it won’t boot! How and why does this happen?
There might be several reasons why you might have this problem:
- The Windows Boot partition has been damaged or deleted.
- You recovered from backup, but did not recover the Windows Boot partition.
- You have been installing other Operating Systems, such as Linux, and that has gotten Windows “confused”.
For example, in this screenshot, this is what a regular installation of Windows should look like when you do a list disk using diskpart:
DISKPART> list volume


  Volume ###  Ltr  Label        Fs     Type        Size     Status     Info

  ----------  ---  -----------  -----  ----------  -------  ---------  --------

  Volume 0     C                NTFS   Partition    637 GB  Healthy    Boot

  Volume 1     R   Racing       NTFS   Partition    292 GB  Healthy

  Volume 2         Recovery     NTFS   Partition    499 MB  Healthy    Hidden

  Volume 3                      FAT32  Partition    100 MB  Healthy    System
In contrast – this is what a non-bootable machine looks like. You can see in this example, the C: and R: drives are present, but the drive called “Recovery” and the 100 MB System drives are missing:
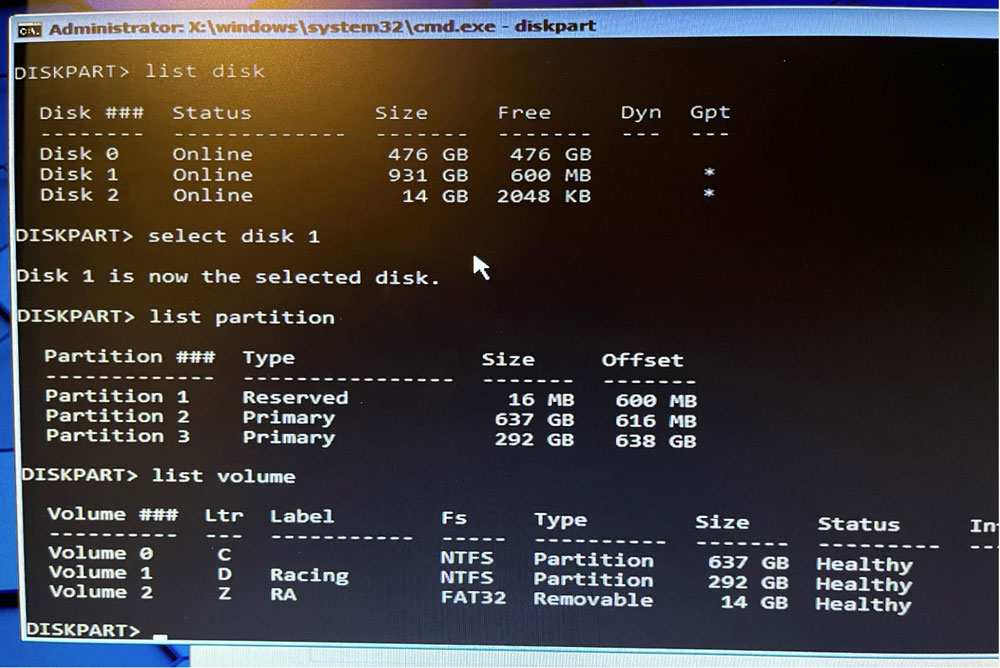
Note: in the screenshot, the Z: drive is a Recovery Environment drive on removable USB.
The full troubleshooting process
Step 1: Boot into a Windows Recovery Environment
If you received Windows on a DVD (remember them?) or USB stick, you can boot the original installer.
Alternatively, you can create your own environment, known as Lifeline Media, from any working Windows machine. Simply download a free 30-day trial of BackupAssist ER, and follow the instructions here:
https://www.backupassist.com/er/documentation/recover/creating-lifeline-recovery-media.htm
After you’ve created your Lifeline Media, you can choose to continue using BackupAssist ER during its trial mode, or uninstall it.
Step 2: Confirm your Windows partition is actually visible
After you’re in your recovery environment, start a command prompt. Then run diskpart, and list volume, to check that your Windows partition is visible and mounted.
You can see in the screenshot above that I had a Windows installation on the C: drive.
Step 3: Run bcdboot.exe to reinstall the boot files
The magic happens when you execute the bcdboot /s command. This will copy the Windows boot environment files to your designated boot device. In this example, I chose the C: itself – in effect, making the C: volume bootable.
Step 4: Update your BIOS to boot the correct device
Reboot your machine. Then follow your motherboard manufacturer’s process to get into the BIOS settings (usually hitting Delete, F2, F10 or F12 during the boot sequence).
You should be able to select the boot device order – modify the order as appropriate, or boot a device directly:

Step 5: Sit back and enjoy
You’ll be back in Windows shortly!
If you migrated your Windows installation from one machine to another, you’ll also see a “Getting devices ready” message, as Windows adapts to the new hardware configuration.

Don’t forget to back up your computer regularly.
Now you’ve had a close call with your system, it’s a good time to review your system backup strategy. Here are some great options:
- BackupAssist ER – for business-grade, disk-to-disk-to-cloud system backups with cyber aware features.
- BackupAssist Classic – for business-grade system backups, offering a variety of disk-to-disk and files-to-cloud options.
- BackupAssist WFH – for work from home environments.
- BackupAssist 365 – for backing up Office 365 to local storage.