Successfully performing a bare-metal recovery involves several important steps.
- Planning: deciding when to do your bare metal backup, and where to put it.
- The bare-metal backup: the steps of creating your system image.
- The bare-metal recovery: the steps of recovering your system image to new hardware.
This article explains how to do all three steps, and shows how to achieve the right backup for a successful bare-metal recovery.
Note on terminology: a “bare-metal backup” is a backup that can be used to completely rebuild a system from scratch. It’s sometimes referred to as a “system image” in Microsoft’s documentation.
1. Planning when and where: backing up your system the right way
Before jumping into the steps of creating bare-metal backups, let’s talk about something even more important: when to backup, and where to put that backup. You’ll need to have a backup schedule that will meet your recovery expectations and a safe location to store the backups.
The right backup schedule
Perform regular bare-metal backups on a daily basis, or at least when major system changes are made.
When a server is recovered, it reverts back to the snapshot in time when the backup was made. This means any changes made to that server after the backup was created will be lost. This means the frequency of your bare-metal backups is important.
If a backup contains just the operating system and system files, you may only need to create backups before and after changes are made to that system. However, if applications and other data change a lot, then daily backups will give better protection.
An alternative strategy is to perform less frequent system image backups and more frequent file and application backups. In that case, when you recover, you’ll firstly recover your system, and then perform an incremental update of your files and applications.
The right backup contains up-to-date data so a server can resume its operations when it is recovered.
The right backup destination
Use backup destinations that keep your bare-metal backups safe from harm.
Now you should decide where to put your backups. This is an important consideration because bare-metal backups can be your last line of defense, and it’s critical that they are not compromised.
The best way to protect bare-metal backups is to use a destination that is offline, offsite or both.
- Offline backups are air-gapped from your network and the internet, so they are protected from hackers, viruses and ransomware.
- Offsite backups are stored in a remote location, so they are protected from threats to your site like fires, floods and theft.
The right backup is protected from the type of threats that can take down a server. Common ways to get offline and offsite backups are to back up to USB hard drive or RDX disk, and to take those disks offline (disconnect them) and offsite.
2. How to create bare-metal backups
A bare-metal backup contains an image of the disks required to perform a full system recovery. This section explains how to create a bare-metal backup using the native Windows Server Backup tools, and BackupAssist.
Create a bare-metal backup using BackupAssist
Follow these steps to create a System Protection image backup:
- Select BackupAssist’s Backup tab.
- Click Create a New Backup Job.
- Click System Protection.
- From the Selections screen, click Back up the Entire System.
- Follow the wizard’s steps to set up the backup schedule, destination and notifications.
- Use the last step Launch RecoverAssist builder to create a bootable media.
Create a bare-metal backup using Windows Server 2019, 2016, 2012 or 2008
Follow these steps to create a bare-metal backup using wbadmin:
- Use Start > Search programs and files to locate the cmd.exe file.
- Right-click the cmd.exe icon and select Run as administrator. This will open an elevated command prompt.
- In the command prompt, type wbadmin start backup -allcritical -backupTarget:E: In this example, E: is the destination drive the backup is being saved to.
- Press Enter.
- Press Y when prompted to start the backup.
Create a bare-metal backup using Windows Server 2003
Follow these steps to create an Automated System Recovery (ASR) backup:
- Run ntbackup.exe from the Run command.
- Select Advanced Mode.
- From the Tools menu, select the ASR Wizard the Automated System Recovery Preparation Wizard will start.
- Click Next to display the Backup Destination screen.
- Select the media type that will be used for the backup.
- Enter the backup media’s location.
- Click Finish when prompted and the backup will start.
- Insert a floppy disk when prompted. This ASR floppy disk will be used to restore system files in the event of a major failure.
3. Restoring a Windows Server with a bare-metal backup
Related article: when to perform a system recovery.
To restore a server, you need to first boot into a recovery environment, which is used to locate the backup and start the recovery process. The specific recovery steps will depend on the software and operating system you use.
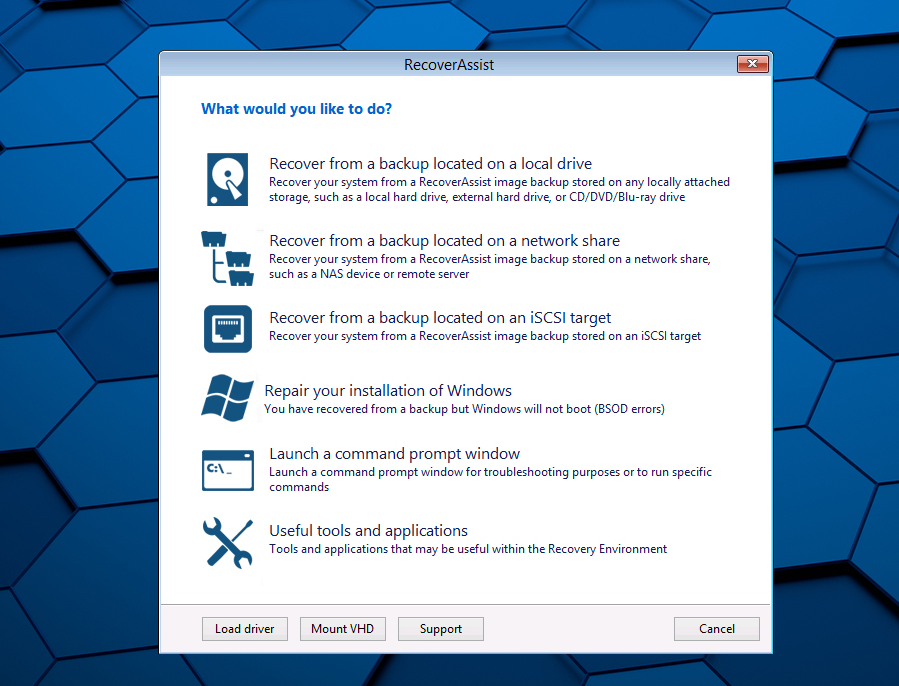
Recover a Windows Server using RecoverAssist
RecoverAssist recovery environments can be built with BackupAssist, making it easy to locate backups, access custom drivers and use recovery tools.
To perform a recovery using RecoverAssist:
- Attach the bootable media that you created using RecoverAssist and start the server.
- Once the recovery environment has loaded, select the backup location from the options provided: local drive, network share or iSCSI target.
- Enter the location’s details and RecoverAssist will scan that location for image backups.
- Choose the backup you want to use.
- Click Next and follow the prompts to start the recovery.
Recover Windows Server 2019, 2016, 2012 or 2008 using the WinRE
The Windows Recovery Environment (WinRE) is used to start a server so you can perform system repairs or a recovery.
To perform a recovery using WinRE:
- Boot the server from the Windows Server DVD.
- Specify your language and time, and click Next.
- Click Repair your computer and WinRE will launch.
- Click Restore your computer using a system image that you created earlier.
- Click Next and the computer will search for a backup image.
- Choose Use the latest available system image (recommended) or Select a system image.
- If you chose Select a system image, select the backup that you want to use.
- Click Finish and then Yes when prompted to start the recovery process.
Recover Windows Server 2003 using Automated System Recovery
Automated System Recovery (ASR) can be used to restore a server’s system drive and any applications and data on that drive.
To perform a recovery using ASR:
- Boot the server from the Windows Server installation CD.
- Press F2 when you see the message ‘Press F2 to run Automated System Recovery (ASR)’.
- Insert the ASR floppy disk when prompted.
- The ASR restore process will format the C: drive and start the Windows Server installation process.
- After a reboot, the Automated System Recovery Wizard will open.
- Confirm the location of the backup.
- NTBackup will then restore the data to the C: drive.
BackupAssist bare-metal backup and recovery
Windows Server includes basic backup and recovery tools, but the functionality they provide falls short of what most businesses require. BackupAssist has been a leader in Windows Server protection since 2002 and includes the features needed to ensure you have the right backups and successful, predictable recoveries.
This table lists some of the key features that an effective backup strategy needs, and compares the solutions provided by Windows Server and BackupAssist.
| Features | Windows Server | BackupAssist |
| Ransomware protection | Not included. | Uses CryptoSafeGuard to protect backups from ransomware and prevent infected servers from being backed up. |
| Encryption | BitLocker encryption requires manual intervention. | BitLocker encryption is built into the backup creation and recovery process. |
| Recovery tools | WinRE gives access to the Windows command-line. | RecoverAssist includes a set of recovery tools, custom driver support and the Windows command-line. |
| iSCSI backup destinations | Not supported. | Supported for BackupAssist System Protection, File Protection and File Archiving backups. |
| Backup scheduling | Basic daily backup schedule. | Fully customizable with built-in schemes including grandfather, father, son. |
| Backup reports | Includes the outcome of the backup job and any errors encountered. | A detailed report that includes destination statistics and the backup’s recovery options. |
| Scripting support | Not included. | Built-in scripting with selectable variables and settings, and script error reporting. |
| Media labeling | Not supported. | Supported for all removable media and backup schemes. |
This screenshot shows all of the recovery options available when you use RecoverAssist.
To learn more, visit BackupAssist and check out our System Protection and RecoverAssist guides.